Download and install Asio4All (Windows only)
If you are using Ableton on a Windows computer, you may want to use the audio driver Asio4All. It’s a free download.
Asio4All is a hardware-independent low-latency ASIO driver for WDM audio devices. Asio4All can be useful to those who experience driver issues and have tested their manufacturer drivers without success.
Using Asio4All is simple. Download it from http://www.asio4all.com/ and follow through the installation.
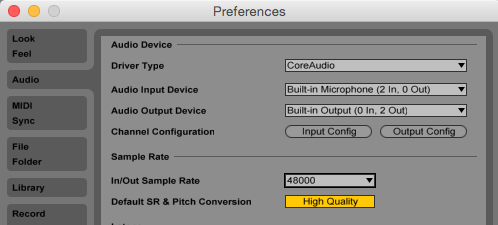
Then in Live, change your Driver to Asio4All:
Preferences >> Audio >> Driver Type.
Adjust Sample Rate & Buffer Size
Sample rate and buffer size are two items to consider that can significantly affect performance.
Sample rate refers to the number of audio samples carried per second. Sample rate is measured in Hz or kHz. In general, higher sample rates will deliver better sound quality – but also diminishing returns the higher you go above CD quality (16-bit at 44.1 kHz).

Ableton’s default sample rate is 44100Hz (Found under Preferences >> Audio >> Sample Rate). For many purposes, this is ideal, because it’s CD quality and many people have a tough time hearing improvements above this.
The downside to using higher sample rates is higher overhead.
So why would producers use any higher options?
48 kHz is the standard audio sampling rate for professional video. And 88.2 kHz and 96 kHz are high-end options, which double the sampling rates of the 44.1 kHz audio standard and the 48 kHz audio for video standard.
Some prefer to sample audio at the highest rate possible, in order to maximize audio quality. For example, if you stretch audio, you’re effectively spreading the samples out over a longer period of time and reducing the sample rate. So, using a higher sample rate with your source material may deliver better sounding results.
Ableton recommends, for best performance and audio quality, that you avoid mixing clips with different sample rates within a single set. Do your sample rate conversion ‘offline’, outside of Live, to make them consistent with the sample rate you’re working at in Live.
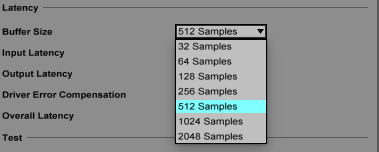
Buffer Size is another setting that may be useful to consider tweaking.

So you’re making a song and adding a ton of tracks to your project. All of the sudden you start to hear crackles and audio drop-outs. Adjusting the buffer size can fix this.
- The higher the buffer size you use, the fewer drop-outs and crackles you will hear, but the higher the latency, too.
- The lower the buffer size you use, the lower the latency, but the more likely you will hear drop-outs and crackles.
Generally, you will want to select the smallest buffer size that you can use with a Live Set, without getting drop-outs.
The usable buffer size will vary, based on the complexity of your Set.
Freezing and Flattening Tracks
Any virtual instruments and effects that you use in a track comes with a cost, in terms of CPU usage.
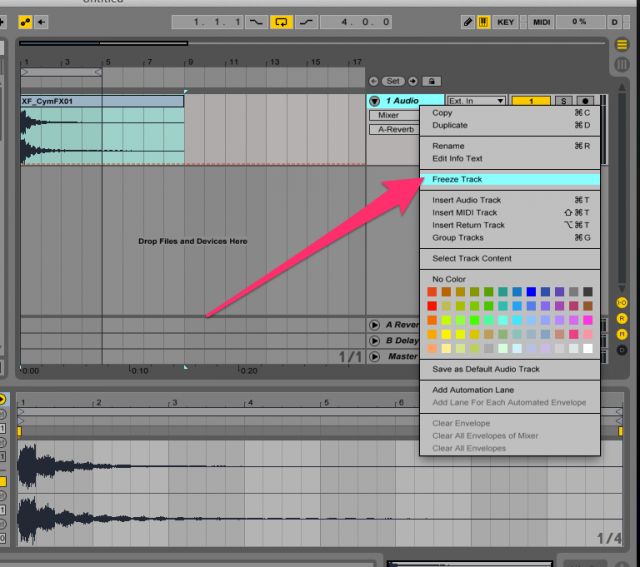
“Freezing” a track bounces it to audio in the background and takes away the CPU intensive activity. This frees up your CPU so that you can do things like run with a lower buffer rate or use more tracks.

To Freeze a track, right click it (or control-click it) and choose Freeze Track.
When you freeze a track, your effects are un-editable until you un-freeze the track. When a track is frozen, you can still adjust the volume, panning, and sends, but can’t adjust the instrument or effects. This can be super useful if you are not sure if you are satisfied with a certain element in your track but you want to save some CPU.
When you are ready to fully commit, there is a flattening option. The flattening option bounces the track straight to audio. At this point there is no un-freeze. Doing this can dramatically improve the performance of Ableton.
VST plugins and audio effects and very strenuous on your CPU. I love using the freeze function, because I know I can always go back and un-freeze the track to make changes.

Great article! I forget about freezing tracks, but that can really make a huge difference.
One more thing that I think helps, at least on Windows, is to have a dedicated user login that you only use for running your DAW. All the junk you do as a normal user of your computer results in additional software getting installed that runs in the background. These can eat up a surprising amount of RAM and CPU, which can make your sequencer more ‘jittery’.
So have a dedicated user that you can use for doing music, and then don’t install any junk or run apps in the background with this ID. If you need to check Facebook or email, switch to your normal user ID and do it.
When you switch back to your DAW ID, your personal user session will get saved to your hard drive, which should free up CPU and memory for your DAW.
That works if you can keep the things installed specific to your audio or your general purpose profile. Some software like Quicktime generally DON’T give you an option when installing and install themselves to the ‘default’ profile, meaning they propagate to ALL profiles on the system.
And, so many things load in your startup that developing a working familiarity with programs like CCleaner and MSConfig is pretty much essential.
The simplest (but not always the most practical) is to run two machines: one for audio which you can keep more secure (and therefor worry less about anti-virus) AND with fewer installed programs and then the general purpose machine with everything else AND the beefy security software. Of course, if the two systems are networked, any software exploits on the general purpose system will likely propagate to your audio system.
On Windows, I’ve always done clean installs after getting a new computer to get of the crapware most installs include. I’ve had antivirus nagware pop up before while I’m recording, and that’s just annoying as hell.
I also feel like you need to doublecheck all the default configurations on PC’s to make sure they are optimized for audio work.
I don’t mean this as a Mac vs PC thing, but on Mac, I’ve never needed to do anything special beyond keeping other apps closed when I record. Antivirus has always been a non-issue on OS X. The closest thing to crapware on OS X is probably iTunes, which is sort of heinous. It’s got its fingers into everything, so it ends up doing a lot of stuff in the background if you leave it open.
SSD’s are the best investment ever. I would never go back. I boot from SSD and put data on an external drive. Going all SSD would be faster, but that’s still too pricey for me.
One thing to watch for is disk encryption, which Apple encourages now. It’s better for privacy and security, but reduces performance!
I use a Mac and have no problems running a completely different OS install on an external drive, run as many of these as you like, simply plug em in and choose which one to boot into at startup.
There’s a HDD image app called Super Duper & it really is Super Duper – it lets you easily swap images around as you like. It’s also great for backups and for trying out and throughly testing an OS or app update before committing to your main drive – absolutely essential if you rely on your computer for professional work.
At £35 for a decent external 500Gb drive it’s almost rude not to have a dedicated install
These recommendations seem pretty basic. One thing I’ve found useful, on a mac at least (I haven’t tried any of the windows apps for this), is being able to carve out a ‘ram disk’ from a large amount of memory. I’ve had a lot of issues with Ableton’s ‘load to RAM’ option with longer sample lengths. If you have a high track count, a lot of RAM, and find that you’re running into disk speed issues, this terminal command:
diskutil erasevolume HFS+ ‘Working Drive’ `hdiutil attach -nomount ram://8388608`
Will create a 4gig drive out of RAM, then you can copy the project folder in. You just have to remember to sync it with your project on the actual hard drive periodically (or have a script to do so) since anything on a ram disk disappears if the computer loses power or crashes.
The best thing I found for making Ableton run better was refining the PC environment, switching off wifi, unused drivers & devices and virus checks (if you aren’t using a DVD drive then kill it), and other background details.
Good tip with the DVD drive!
unwarping tracks also
Does that mean rendering them after you’ve played around?
Yeah – drop the warped clip into arrangement view, select it and hit cmd/ctrl + J to consolidate it.
SSD does make a marked difference – the one downside to consider with the added expense is that the SSD will have around 1/4 of the lifespan of a traditional HDD – and while using the SSD as a recording disk is tempting, the more data writes = shorter lifespan. I run my OS from a SSD with my cache and recording on a decent quality 1TB drive with 6gBps and I can record 8 stereo channels with nary a glitch, at 88kHz. Of course, the interface has something to do with that.
This all takes place on a PC, Win7 8gb ram, dual core 3.1gHz cpu. The shortcomings with SSD however are platform independent.
Hey, I saw a article yesterday that said that said SSD lifespan was a problem when the first came out, but not something to worry about with current drives:
http://www.pcworld.com/article/2856052/grueling-endurance-test-blows-away-ssd-durability-fears.html
oh good !! thanks !!
SSDs have come a long way:
http://techreport.com/review/26523/the-ssd-endurance-experiment-casualties-on-the-way-to-a-petabyte
A nice setup is to use an internal SSD and then backup via Airport Extreme to a traditional hard drive. It gets you the best of both worlds.
Thank you for letting me guest post here:) I am glad to see people are enjoying the article already!
Does using an ASIO interface (such as Komplete Audio or the Focusrite interfaces) help lessen the load on the computer’s RAM?
It mainly helps with the latency. It could help a bit since your built in sound card isn’t working as hard. I would recommend getting an external sound card only if you feel you really need it.
All pretty elementary stuff, as for the guy above who is getting sequencer jitter, that should never be a problem on windows 7 above unless you have a virus or may be your hard drive is chocker
So here is my tip, run a check disk, defrag it( advisable not to defrag Solid State though) and if need be create a new profile, empty your temp items. Type in msconfig to the start search text box, from startup tab deselect all the processes that you don’t want running in the background, with modern processes you shouldn’t need to create a separate profile for using live just make sure they all the crap like iTunes updates and God knows what else are not plaguing you. Instead of having a proactive virus checker that is constantly churning a way download Malware bytes and run it weekly, and it’s free.
Whiteblob – just about any modern computer will have some jitter when doing MIDI sequencing, because of background multi-tasking, compared to a hardware sequencer. Old Atari and pre-osx macs were tight, too.
Other than that, all your suggestions seem like they’d make sense for WIndows users. To Mac users, though, it sounds like rigamarole that shouldn’t be necessary with a modern operating system.
The issue is you should choose what to be running, not your OS maker – like how it is good to virus check, but having it running in the background on boot up on a audio system is a bad call. Many Windows users tweak to get the some out of the box, this is mainly due to more latency in the audio layers that forces a tweak. Macs are designed to run a riskier low latency setup as standard, as the hardware is standard and known. But Mac users are notorious for not tweaking the OS to get the most of it, just because they get a better deal in the first place – and in general don’t know much about the hardware. It doesn’t matter what OS you are running, you should always strip it back to be doing the things you what it to be doing, and have no surprises. I’ve heard of a live gigs getting tripped up by software asking to check for updates!
dear chaz
as you don’t beleave me please read the much touted interview with roger linn about the myth of hardware sequencers http://www.attackmagazine.com/features/roger-linn-swing-groove-magic-mpc-timing/
the only point i would disagree with roger is that it can be achieved on windows machine if your running the right hardware and software set up. an i7 processor has more threads than a windows 7 os can throw at it, so as long as you don’t bog it down with other crap it will work perfect.
as for midi, as long as your device has a decent driver written for it by the manufacture it will work as good as a mac. I use a mac at home and I confess they are better than windows machines mainly because of apples diligence when creating a platform, in this respects to music making through its own midi drivers. But at work i am a qualified IT technician although I do work in a mainly AV environment now (for my sins). windows and the hardware isn’t as bad as people make out, most peoples issues with windows can be solved with a bit of knowledge and experience.
whiteblob
It sounds like you may be a little confused about what MIDI jitter is and why it matters.
‘Swing” or groove, as Linn notes, is not magic – it’s a function of things like how offbeats are delayed from onbeats, dynamics and importantly – the tightness of your hardware or software.
Jitter is a measure of how accurate or inaccurate the timing of events is, and it’s well documented that this varies A TON from device to device and from system to system.
In general, you can rank sequencers from ‘tight’ to ‘sloppy’ like this:
control voltage sequencing is dead nuts on;
good hardware sequencers like MPCs and old non-multitasking computers are very tight;
badly designed hardware sequencers and modern computers/apps tend to have a lot more ‘slop’, especially with MIDI.
There are a lot of sites that talk about this:
Innerclock has tested tons of systems for jitter. Check out their site – it has lots of information on this:
http://www.innerclocksystems.com/new%20ics%20litmus.html
Eigenzone has a lot of good information on MIDI jitter, too:
http://www.eigenzone.org/2012/12/04/midi-jitter
VAC compared modern computers against an old Atari a few years ago, and he found that the Atari still blew away the modern systems:
http://www.velvetacidchrist.com/2010/02/16/midi-woes-computers-suck-with-hardware-a-grim-tale/
In my experience, you get a lot tighter sequencing in a DAW if you convert to audio and sequence audio vs MIDI.
If you use a desktop PC, get a high-capacity USB drive, stick it on an unused USB slot on the back of your computer and then configure it as a Readyboost drive:
http://windows.microsoft.com/en-us/windows7/products/features/readyboost
This basically gives you the same benefits as Apple’s Fusion drives – recently used data gets copied to the flash drive and your read/write speeds will be way faster.
When I figured this out, I was amazed at how much it sped up my older computer and it’s basically free to try out.
Hi and thx for the tip! It also aplies for Windows 8.1?
all these amazing tips!! thanks everyone:DD
These are some great suggestions, but unless you’re running a top-of-the-line PC or a specced out Mac, Live just eats shit! I think it’s unethical and just bad form for Ableton to sell their software at such a jacked up price, and yet the consumer still has to supply just as expensive hardware infrastructure to get more than 8 tracks with minimal effects ITB. I honestly don’t think that having to upgrade your PC is viable software solution, and when is Live going to feature a scratch disk preference?
Live 9 has a preference for its temporary file location as well as its decoding cache location.
Buy a I7 5820k or above with a x99 Motherboard. Then you have the Power with 4000 MHZ and you’re Happy! Believe me.
Then you only making music and no computer support!
Hi,
I tried the sending option its works great. Also the freeze > flatten way is also pretty good for reducing cpu overload.
On Winodwa Open Task manager > More Details > Processes
Sort By name so you see Ableton Live. It should have a number of process under it so lick on the > to see them
For Ableton Live right click and bring up “Go To Details”
This will bring up the proces view Right click again and click on “Set Priority” set it to Realtime.\
I recommend doing this for “Console Windows Host” as well
You’ll see a marked increas in performance especially ehrn doing a large export.
Hello, It mainly helps with the latency.Thank you guest post here:) I am very happy to see people are enjoying the article already!